
Ogden Cami - Modified // Sewing For Women

I made an Ogden once before (a look HERE), several years ago, and it was never "quite right". It fit okay, but I never reached for it because there were a few things that were just a bit "off".
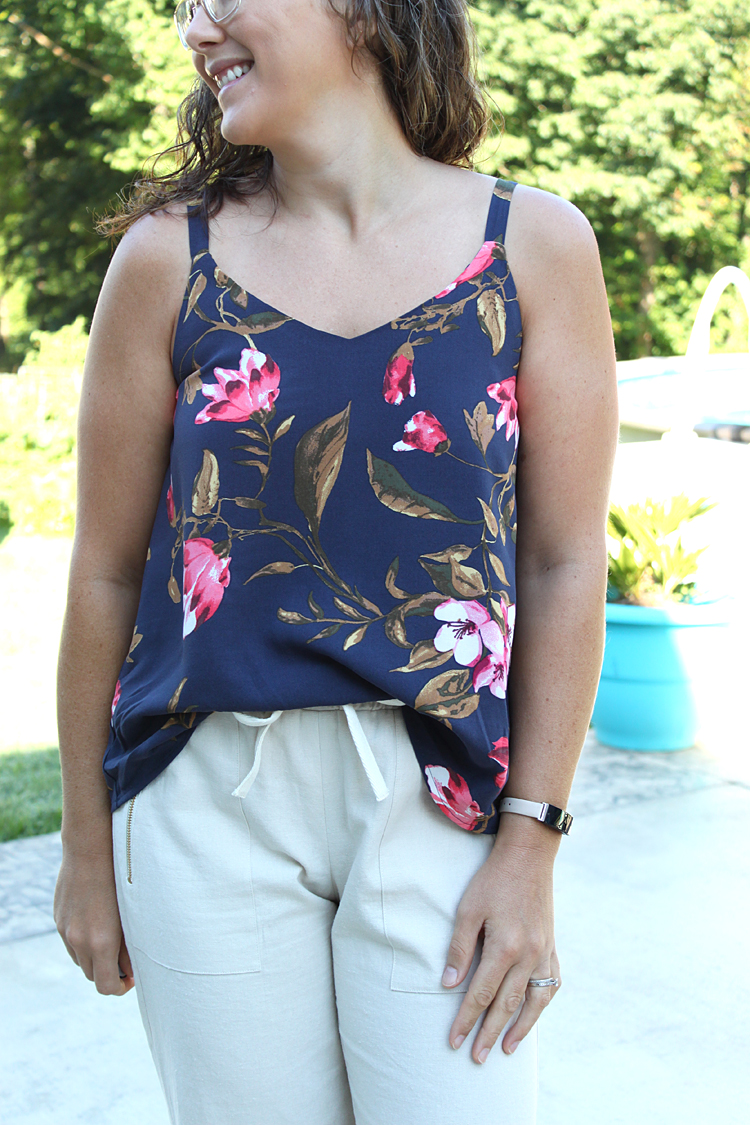
I had some gaping at the chest, the facing kept creeping up, even though I had understitched, and since I have a broad upper back, I felt like the shape of the back wasn't very flattering on me.
I had raised the front v-neck on my first version, and while I liked a little more coverage there, I wasn't sure if that was the cause of some of my frustration?

Moving on to today! I knew I really wanted to make the Ogden again, and try to figure out the issues I'd had with my first one. To be honest, I cut this Ogden out many, many months ago, and only just sewed it! So I'm going off of my pattern pieces to determine all of the tweaks I did to the pattern since I couldn't remember exactly what all I did, and had planned to do! Haha.

The first change I made was to go up a size. Since I began working out, my upper body has indeed changed quite a bit and I've gained about 1/2 an inch in my upper bust measurement. I made a size 8. [35.5/36.5/29.5/38]
I raised the front v slightly by cutting along the largest size, instead of the size 8, this raised it by 1/16" more than 1/4". 5/16" to be exact. :)

The back was the most significant cosmetic change I made, I raised the back neckline up to be higher than the front and curved it rather than a v, like the original pattern. The center back was raised by 3", I used my curved ruler to help me create a nice curve for the neckline.

I also lengthened the front facing by about 2 inches. I say about because it was apparently eyeballed and I didn't write it down on my pattern piece. Doh. It appears I cut it mostly straight across the front and curved it slightly up at the side seam. I didn't lengthen the back facing but curved the sides down slightly to meet the front facing at the side seams.

Despite not giving my future self much information about it, the length works really well and feels much more comfortable to me than the length of the original facing.

I widened the straps ever so slightly by taking a 1/4" seam allowance rather than 3/8". It gives just a tiny bit more coverage, and I'm happy with that result as well!

I made no fit changes to the body of the tank. Next time (and there will now DEFINITELY be a next time!) I plan to shorten by an inch or two. Since most of my bottoms are pretty high-waisted a shorter cami will be perfect for me!

All in all, I am very happy with how this Ogden Cami turned out! I feel like I finally understand what the hype is all about. I'm glad I worked out my minor fit issues. Now I plan to use it for lots of scrap busting!!

The fabric is from fabric.com by way of Amazon (my storefront with fabric recs HERE), but no longer available. The piece I used for the cami is a scrap from my Shelby Romper (see HERE). I had to piece the back facing to make it fit and ended up with two left side facing pieces, so half of the facing is showing the wrong side. HA!! But since it was a test of sorts to check the fit, I decided to do it anyway. Now when I look at it, I'm simply reminded of my experimenting, and that IT WORKED!
😄
😄

Thanks for stopping by!
~Happy Sewing!
~Happy Sewing!
I made my first Ogden today and had similar fit issues. I am going to try your adjustments on the next one. :)
ReplyDelete