Button Back Willamette Shirt // Sewing For Women
Thursday, February 28, 2019

Hello my friends!
One of my favorite personal sewing challenges is to recreate an image I find, often on Pinterest, or even a RTW (Ready To Wear) clothing ad. I love the thrill of hunting down the perfect fabric, figuring out the pattern and finally styling it just right.
Sometimes, serendipitously, the right fabric almost falls in my lap from the sky, and I'm catapulted into action. This was the case with today's Willamette Shirt.

I was innocently meandering (as one does) through the aisles of my local Joann Store, and this fabric literally made me stop in my tracks, gasp out loud, and as soon as my fingers grazed the fabric, I snatched up the bolt and placed it in my cart. My heart pounded and I barely glazed over the rest of the fabric before I bolted for the cutting counter. As if the fabric in my hands might disappear or something... You think I'm being dramatic...
This fabric is 100% linen, and really nice. It was easy to sew with, is super comfortable to wear. I'm looking forward to wearing it this summer when the weather is unbearably hot, but I'll still be cool and comfy!
I knew immediately that I would make a Willamette Shirt with it, and then feeling extra brave (apparently), only bought 1 1/2 yards of it, even though it was only 53" wide. It was a little on the pricey side and I figured I could surely make it work.

I did make it work, but there was a lot of pattern tetris that had to happen, especially since I was matching up stripes and did a tiny little hack on the back pattern piece that took up ever so slightly more fabric than cutting on the fold would have. And since I'm sure you're curious, I was able to cut a size 6 from that amount of fabric with just the teeniest of scraps left over.

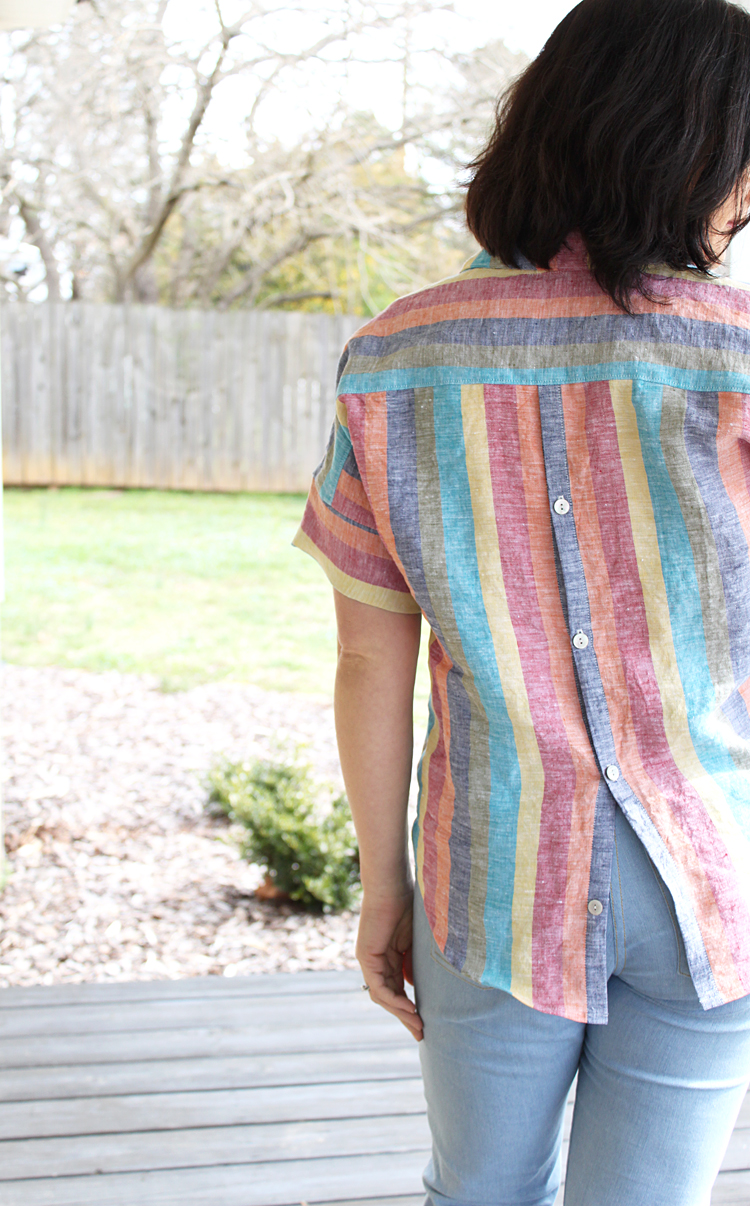
From the front, this shirt appears to just be a straight Willamette as per the pattern, but in the back; surprise! It has a button placket!

This was inpsired by this pin that I hunted down and tracked it to the source, which was, obviously, a shirt Madewell sold.

The inspiration shirt had a pleat in the front, but I decided to just keep things simple with the overlapping front placket as per the pattern. I did however, really like the button placket down the back and it was as simple as cutting the back in two pieces, rather than on the fold. I didn't add any extra seam allowance, simply cut along the fold edge on the pattern.

[Source]

[Source]
To do this, I just replaced the pleat on the Willamette with a placket! I cut a one inch strip of interfacing, and fused it to the wrong side of the center back, lining it up with the pleat notch. To create the placket, I folded in the raw edge by 1/4", and then 5/8" to cover the interfacing. Next, I edge stitched along the folded edge and that was my placket! From there you simply overlap the plackets and proceed on with the pattern instructions.


Such a simple hack, but such a fun detail!

And of course, here is my recreation of the original pin that inspired me. I'm pretty happy with how it all turned out! :)

So there you have it! My latest and favoritest (only because it's the last one I made ;)) Willamette Shirt! I have plans to make at least 3 more this spring, so don't be surprised if you see more popping up around here. It's such a great pattern base for hacking into the comfiest, and super stylish, shirts!
If you haven't tried this pattern yet, I highly recommend you do! It's definitely a staple for me.


Top:
- Willamette Shirt - Pattern by Hey June Handmade
- Fabric - 100% Linen from Joann Stores, found HERE
Pants:
- Ash Jeans - Pattern by Megan Nielsen - unblogged (sorry!)
- Fabric - Tencel Stretch Denim from Joann Stores, not availabe online
Shoes:
- Target - no longer available


