Gathered Shoulder Willamette Shirt // Sewing For Women

I have another super simple Willamette Shirt modification for you today!

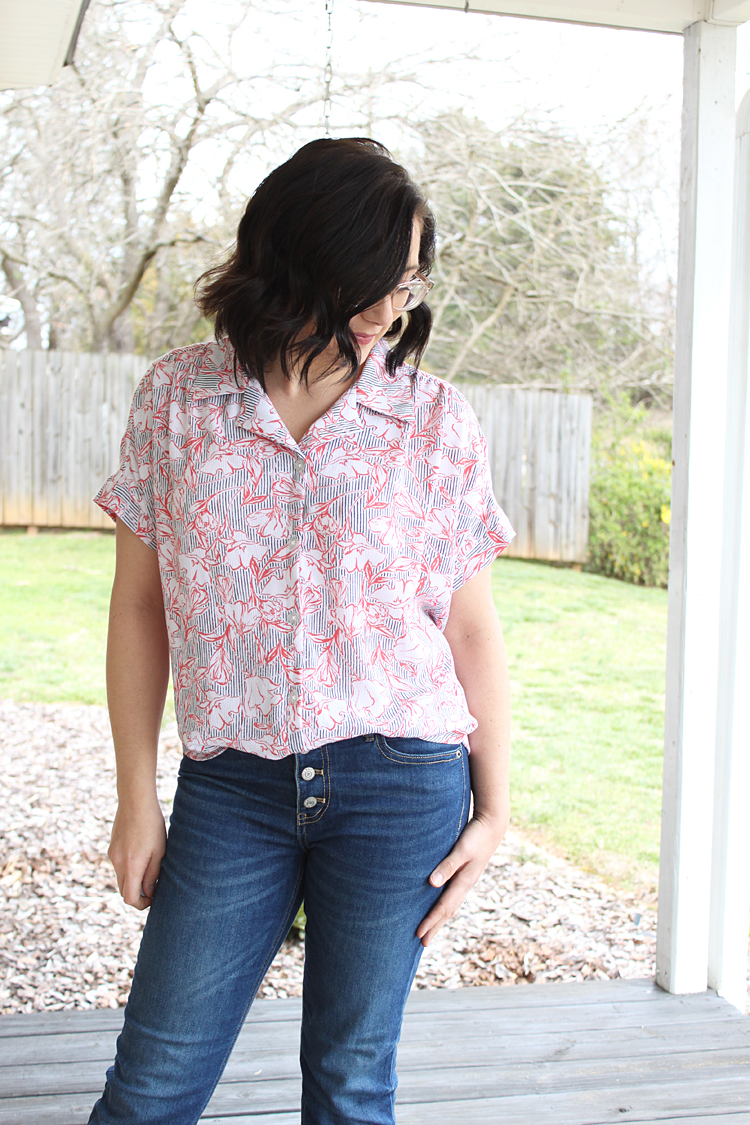
I was of course inspired by another Madewell version of a button-up. The Madewell Central Shirt has a loose slouchy fit, buttons down the front and a gathered detail at the shoulder that I loved and had to recreate.

This hack required a small amount of altering the paper pattern. I wanted the gathers to be slightly more forward on my shoulder than the original Willamette, so I moved the shoulder seam forward 1 1/2". Apparently Loni of @HavinSewMuchFun and I were on the same wave-length, because just about a week before I was ready to dive into this project, she created a very similar version! She saved me some brain power and even made a tutorial for how to move the shoulder seam forward! You can check that out HERE.
I was going for a less dramatic gathered effect on my version, so instead of splitting and sliding the pattern apart like she did, I used a slash-and-spread method.

I picked 3 evenly spaced points across the (lowered) shoulder and cut slashes all the way down to the hemline. Then I spread each slash apart 1", for a total of 3 extra inches of width in the shoulder.

When assembling my shirt front, I started my gathers 2 inches from the neckline. The length of my gathered area was 6 inches. An easy way to do this is to mark the gathering area with pins, sew gathering stitches, and then pin the front bodice to the yoke. Start at the end of the sleeve and pin until you reach the gathering point, pin the 2 inches at the neckline and then gather what remains to fit.

I also gathered the back instead of making a pleat, I used the same method as the front and gathered the area between the pleat notches.

Another modification I made was to put buttons down the entire front of the shirt rather than overlapping and sewing. I just stitched the facing down and used that area as my button placket. I started at the optional button point included in the pattern and sewed 5 buttons and button holes, evenly spaced, down to the bottom.

I also shortened the back hem 1 1/2", because I plan to always tie or tuck the front of this shirt and I wanted it to have a little less fabric at the back of the shirt. This created a fairly even hemline, while still having the shirt hem look at the sides.

The last thing I changed up was the sleeve cuffs, I simply made them half the length of the pattern piece and then stitched it to the sleeve to finish it off. This basically gives the same look as the original pattern, but the cuff is not folded up.

The fabric I used for this shirt is a nice lightweight rayon crepe that I spied at Joann Stores. It has the perfect drape and flowiness for this type of shirt! It shows the gathers really well, and hangs loosely and beautifully around the body. It will be so perfect for a hot summer, I cannot wait for it to heat up so I can get some proper wear out of it!

The last thing I will note is that for all of my Willamette Shirts I've made so far, I have sized down one size from where my measurements place me on the size chart. I'm so pleased with the fit! It's loose without being super oversized and also not too small for this type of shirt. For reference, I make a size 6 (no changes), my measurements currently are; B: 36, W: 29, H: 37.25.

And that's it for my fourth, and in no way final, Willamette Shirt! You can see my other tops here; 1 - Tie Front Blue Stripe, 2 - Tie Front Cotton Hemp, 3 - Button Back Hack.

And since I've had some questions already, to tie the bottom, I simply unbutton the bottom button and tie the shirt tails together to create this look! Easy peasy!


If this hasn't convinced you that you need the Willamette Shirt Pattern in your life, I'm not sure what else I can do! ;)
Thanks so much for stopping by and Happy Sewing!! xo ~ Heidi

I love this so much, Heidi! Thank you for the details on all of your adjustments! I never would have thought to size down or so the sleeves that way. Definitely coming back to this later. 👍
ReplyDelete