A Fashionable Type - YAY Banner Tee Tutorial

I am so excited to be a part of Stacey's (Boy, Oh Boy, Oh Boy) totally awesome series today! I have long been a fan of letters, numbers, words and phrases, on tees especially, but on all sorts of apparel and also in home decor. So I was very thrilled to be a part of this fun series!
I have had this pin pinned for quite a while now and absolutely love it. I decided to make my own version of it. Keep scrolling for the tutorial so you can make one for yourself as well!

I made the tee using Dana's free Basic Tee pattern. I made just a couple of adjustments and sized up just a wee bit, even though the pattern is a 4-5 already. I wanted just a little bit of a looser fit and a longer length. Also this way maybe he'll get more wear out of it...
For the fabric, I used a Goodwill 4XL polo shirt that I found.

Ok, I'm just going to over share about how much I love a good thrift store hunt for fabric for kids clothes!! For example the shirt above... I paid $3.75 for it. It did have a teeny bit of staining that I had to work around, otherwise I could have easily made two (TWO!!) of these shirts from the fabric. Also the ribbing on the collar and sleeves is perrrrfect to reuse on the neckline or sleeves of another tee. I measured the ribbing on the collar and it's the exact width needed for the Soleil Dress and I plan to use it on my next one! Also the buttons on the placket can be removed and used for another purpose. Oh and bonus! There was an extra button hiding on the care tag inside! :)

Also the fabric of this shirt is uber soft. The label says "Supima Cotton - Luster Soft Collection". It's super comfy stuff... So just to summarize... I have more than enough fabric for a 5/6ish tee (large scraps leftover, I could probably squeeze an infant tee or onesie out of them yet, even with the stains), 3 buttons and LOTS of nice ribbing. All for $3.75...
Haha, can you tell I'm hooked? So do yourself a favor and check your local thrift store for some large size shirts in good quality fabrics and you've found yourself a deal! And even more awesome... I reused the original hem, so big time saver there!
The couple of changes I made to the tee pattern are simple. I lengthened the hemline and then placed the existing shirt hem on the new pattern hemline, therefore lengthening the whole pattern by approximately 2 inches. I also scooted the center fold in just a bit to make a wider tee.

I also added ribbing to the sleeves to create the look I was going for and did not take off for the hem I was eliminating. So that added another inch to the sleeve length as well.

I made the banner on the front of the tee with a freezer paper stencil and fabric paint. Keep scrolling for the tutorial!
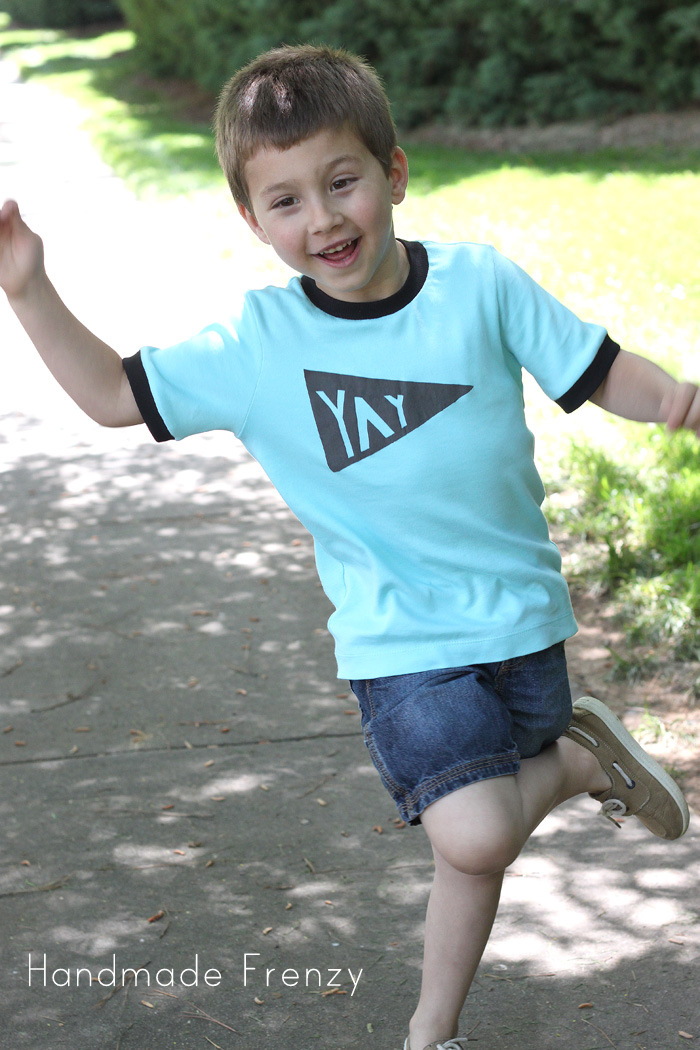
I used a velveteen finish paint. I like the fun texture it added!

He was seriously so thrilled with the shirt! It's more fun sewing for him now then ever because he genuinely is thrilled with everything I've made for him lately. Probably because his sister seems to get quite a bit more sewing done for her than he does... :)


I love this goofy kid and his fun new shirt!

And I also really, really love this color combo on him... I'm having a hard time steering away from it lately!


And now for the tutorial so you can make your own Banner Tee!!
Supplies you'll need:
- Cardboard
- Tee pattern - or an already made tee
- Fabric Paint - any kind will do, I used a Velveteen Finish
- Brush
- Freezer Paper
- Exacto Knife
- Cutting Mat
First of all, you'll need to create your stencil on the freezer paper.

I used a ruler for the straight lines and freehanded some to make mine, but feel free to create a graphic on your computer and just trace it from there if you'd rather! The photo above shows the dimensions I used when I made my triangle. Nothing fancy at all, but it was the hand-drawn look I was going for.
Next, use your knife to carefully cut out the letters. Be super careful to not cut into the letters at all, as this is what you will be using to create the phrase on the shirt.
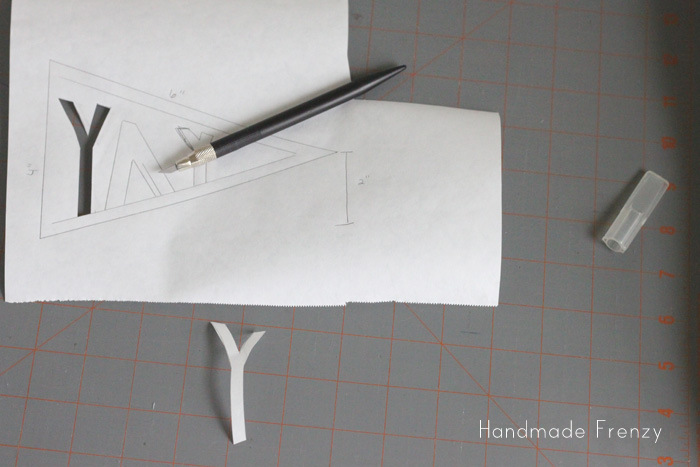
Cut out each of the letters.

Next cut out the triangle. These are the exact stencil pieces you will use on the shirt.

You will also be left with this that you could use to make something coordinating as well. I'm thinking a tee for little sis might be cute!

Place the banner stencil on the shirt. I used a clear ruler to make sure everything was straight.

Then iron it on. A high heat is good, and pay special attention to the edges. These need to be sealed very well to prevent any bleeding when you paint over it.

Next place the letters, one at a time. You can use your triangle cutout as a reference for placement. Again, pay special attention to the edges.
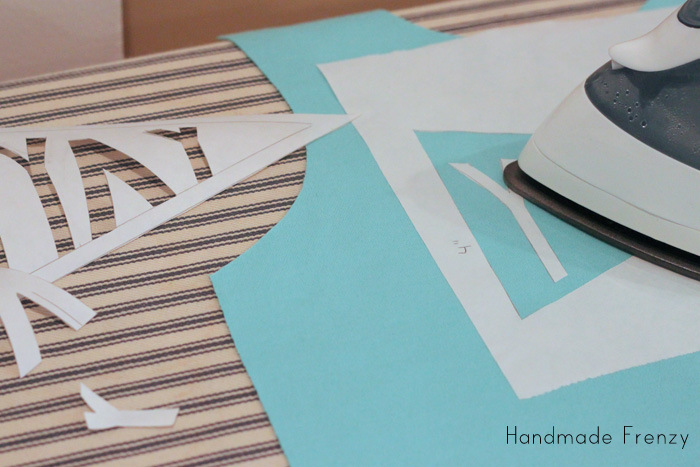
All ironed and ready to go!

Now place the shirt front on a piece of cardboard and get your paint and brush.
Note: I was making my tee so I did this before sewing the shirt together. If you are using an already made tee, find a piece of cardboard that will fit inside the shirt before painting to prevent bleed-through.

Cover the entire stencil with paint. Pay attention to the edges to make sure they are covered, but try not to "push" paint into the edges. Apply 2 coats if needed. This black required 2 coats.
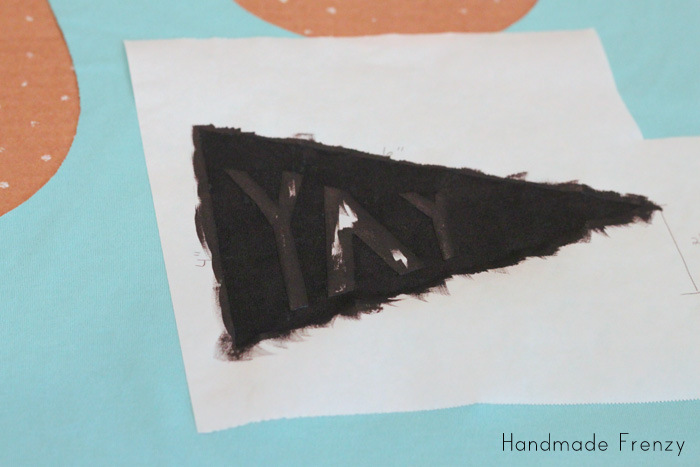
Once the paint is dry to the touch and not tacky anymore, slowly and carefully peel back the freezer paper. Go slowly so you don't pull up the paint, this helps get a nice clean line.

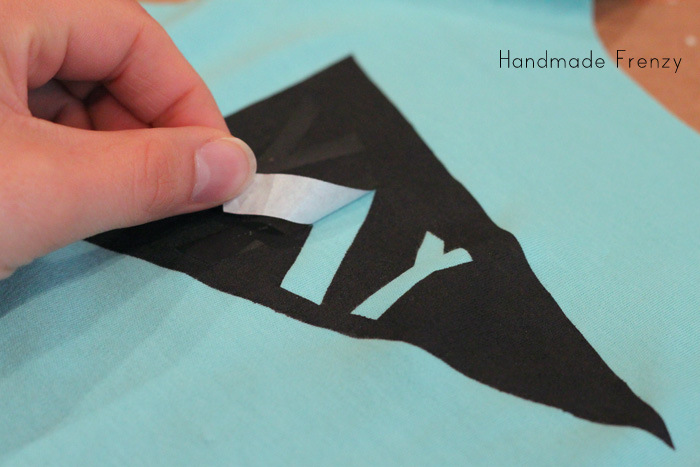
For the letters I found my knife to be helpful in lifting a corner to get them started.

After letting the paint dry the amount of time specified on the product, you will want to heat set. To do this, place a press cloth on top of the painted area and press. This particular paint turned to a velveteen like texture after heat setting. Fun, fun!
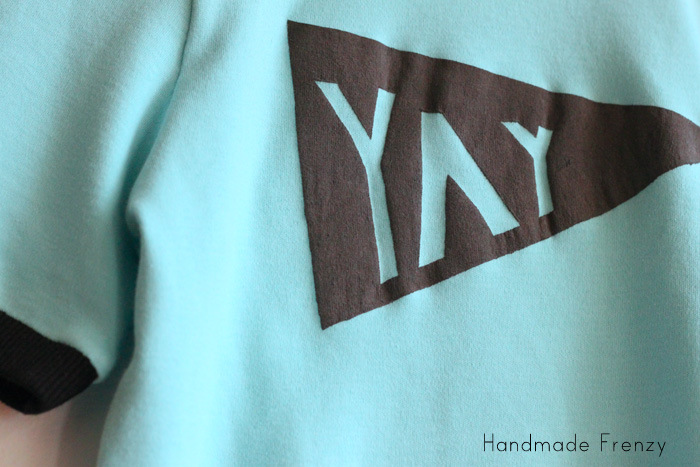
Sew up the shirt and then step back and admire your work!


And put it on a great little boy (or girl) who loves it just as much as you do!

Thanks for stopping by and click on the button above for a list of the other participants in the series. There are lots of awesome things being created!!
Also be sure to check out Stacey's blog each day of the series, because there is an amazing giveaway each day! Today's giveaway if for Sweet Lucy Jack, talk about some cute baby loot you could win!!
Also, there is a linky party going on thru Saturday, you can link up your own Fashionable Typography creations! *Scroll to the bottom of the post to link up!*
Outfit details:
Shirt: Pattern=Basic Tee by Dana
Fabric: Main-Thrifted shirt & Freezer Paper Stencil; Ribbing-Joann
Shorts: Old Navy
Shoes: Marshalls
Happy Sewing!


This looks fantastic Heidi and your son looks very happy with it, what a cutie!
ReplyDeleteThanks Laura! He was pretty thrilled with it. Every time he wears it he tells people "this is my shirt that says, YAY." Lol :)
DeleteThat's so cute! He looks so happy in it too.
ReplyDeleteThank you Abby! :)
DeleteThis is very cute look. I just adore this!
ReplyDeleteWith Love,
Scary
Thank you Scary! I have wanted to make this for forever, so happy I finally had the "reason" too :)
DeleteI love this! So cute!
ReplyDeleteThanks so much Delia!!
DeleteOh yes!!! I love hearing children are proud of what their mummy's sew for them!! He seems so happy!! Lol
ReplyDeleteI love it!