Festive Summer Outfit - Girl Version
Hello friends! I'm so glad you are stopping by today.
So I had totally planned this awesome brother/sister outfit post for today, but... Unfortunately, I am only one woman, and life and kids and the fact that I may be a bit of a perfectionist and a slow sewer rainy weather, so no pictures, all got in the way of this awesome post. :( But no worries, I'll have it for you soon!
I'll give you a teaser of what I have planned. I decided my kiddos needed "Festive Summer Outfits" this year. Something that can be worn at any time throughout the summer, to picnics, festivals, anywhere I want them to be ridiculously cute in their kinda matchy, kinda not, outfits. :) I wanted fun summery outfits that could be worn anytime, anywhere, but also wanted it to be something that could translate as "festive", and be worn for the summer holidays. So my theme was red, white and blue, but not stars and stripes. Get it? :)
So today you will be getting the DETAILS about Olivia's outfit. The next post will be the brother/sister set. Kind of flip-flopped but I hope you'll forgive me. :) And there will also be a detail post about Evan's outfit. Of which I am over the moon excited about!!!
If you stopped in on Saturday, you saw that I did a guest post over at Homemade Ginger and showed off this little summer outfit I made for Olivia. Now you get to see the nitty gritty details. I hope you will be inspired. :)
I have been wanting to try Dana's Circle Skirt tutorial over at MADE, and as soon as I saw the Double Layer Circle Skirt I knew this was the version I needed to make!
Seriously. Can you stand the cuteness!?!?
The bottom layer fabric is a very lightweight chambray. Rather then folding the bottom under and hemming I decided to try to get a lettuce edge effect. As I sewed a zig-zag edge, I stretched the fabric slightly and it gave a nice subtle effect. I was really pleased with how it turned out! I did the same thing for the top layer, it is a quilting cotton and didn't have quite as much of a flutter effect as the chambray but it still worked quite well. Adding even more flutter to the already fluttered design, why not?
And now for the top. I love it. Love. It. I made it using the Geranium Dress Pattern bodice.
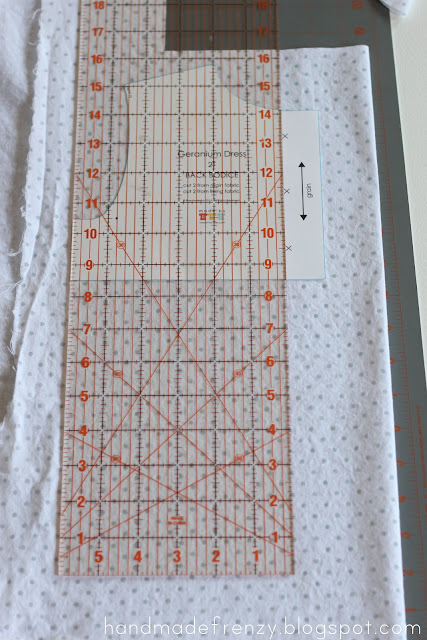
To make the top, I started out with the bodice pattern for the Geranium Dress.
Then I laid an existing shirt that fits well over top of the pattern to figure out how much longer I wanted to make the bodice. As you can see it was about 7 inches longer than the pattern. I added another 1 1/2" to that length to give myself room to work with.
I didn't want to line this top, like the pattern calls for, so for the back I first figured out how much width I would need to add to be able to reinforce the button holes. As you can see in the photo below the button placket area measured about 1 1/2".
So before cutting, I added that much by moving the pattern over, away from the edge by 1 1/2". (I laid the pattern on the fold so I added an extra 1/8" which I cut off so I would have two separate pieces, just in case you were wondering :))
Then I measured 8 1/2" down from the bottom of the bodice pattern and cut it out.
To finish the sleeves and neck, I folded first 1/8" then 1/4" and topstitched. To be honest, I was kind of too lazy to make a facing for the neckhole. But after I sewed the whole top up, I read about this really neat trick using bias strips here. I will definitely be using that method in the future!
Fold raw edge under 1/8" and press...
Then 1/4" and press.
I used some pins to help keep it in place around the sharper curves.
Then topstitch.
To reinforce the button area, I first folded the raw edge in 3/8", which is the pattern's seam allowance.
Then I added a strip of interfacing 1 1/4" wide by the length of the top.
Once the interfacing is applied, fold the edge over again 1 1/2" and topstitch. Do this to both sides of the back. And then you have a nice strong area to add your buttons!
To finish the top, hem the bottom to the desired length. I chose to fold the raw edge under 1/2", then 3/4" and hemmed.
(Since we're showing such extreme close-ups of my ironing board cover, you can go here to read how to make your own!)
Add your buttons and button holes, and your done!
Can I just tell you that photographing white on white can really be a challenge??? Whew.
To finish off the plain front I added this little bow I made from a strip of jersey knit and handstitched it to the front. It added the perfect amount of cute whimsy I was going for.
I must admit. This outfit really stretched my pattern mixing skills. I was unsure about mixing the TWO polka dots and then adding stripes yet. And another oops, I had totally planned to add the little flutter sleeves to the top, even cut them out and everything... but somewhere along the way I got carried away and finished the armhole edges before I remembered about the sleeves, and by then I wasn't going to go back and add them. Even with all that I am SO happy with how this turned out! I'm happy about the sleeve oops, because the flutter sleeves might have been a bit much... I think every new thing I make becomes my favorite, but this is my favorite thing I've made for her yet (at present)!
And now she's all ready for some summer fun!
If you popped over to read my guest post on Homemade Ginger, you've already seen these photos, so just humor me, kay? :)
The little bow she is wearing in her hair was also made by me. I followed the picture tutorial on this pin which I pinned to my For The Girlie board on Pinterest.
Thanks so much for reading!
Happy Sewing!
Linking up here:


No comments
Post a Comment
Jump in the conversation! Leave some comment love...