
Handmade Summer Series Part One: Simple Girls Tank Top
For the next seven weeks me and Heidi are going to show you how simple and fun it is to make your own kids summer clothes! Not to mention how inexpensive and unique you can make every piece!
First up is a Simple Girls Tank Top!


Simple? Check.
Cute? Check.
Cheap? Double Check.
I used one fat quarter per tank top I made for my daughter Sadie. If you are new to sewing then you should definitely know that fat quarters are awesome (I even have a whole pinterest board dedicated to them). You can get a quarter yard of fabric anywhere from .80 to 3.00 depending on what fabric you choose and where you purchase them... most fabrics from Hobby Lobby or Joanns will only run you about $1.20-$1.50! Plus you will have scraps left over (which you should never toss)!
So you can have a custom made tank top in the exact color you have always dreamed of for around $1... tell me thats not awesome! Cheaper than Goodwill... cheaper than a consignment shop... and much cheaper than any store! Plus they look super adorbs!
Also before I get started let me just add that once you get this pattern down pat you can make one top in about 30 minutes! Fast? Check.
The pattern I have included is for a 2T tank top. If your little lady is bigger or smaller than that, then this first step is for you! I'm going to start by showing you how simple it is to draft your own pattern from a tank or top that already fits her perfectly!
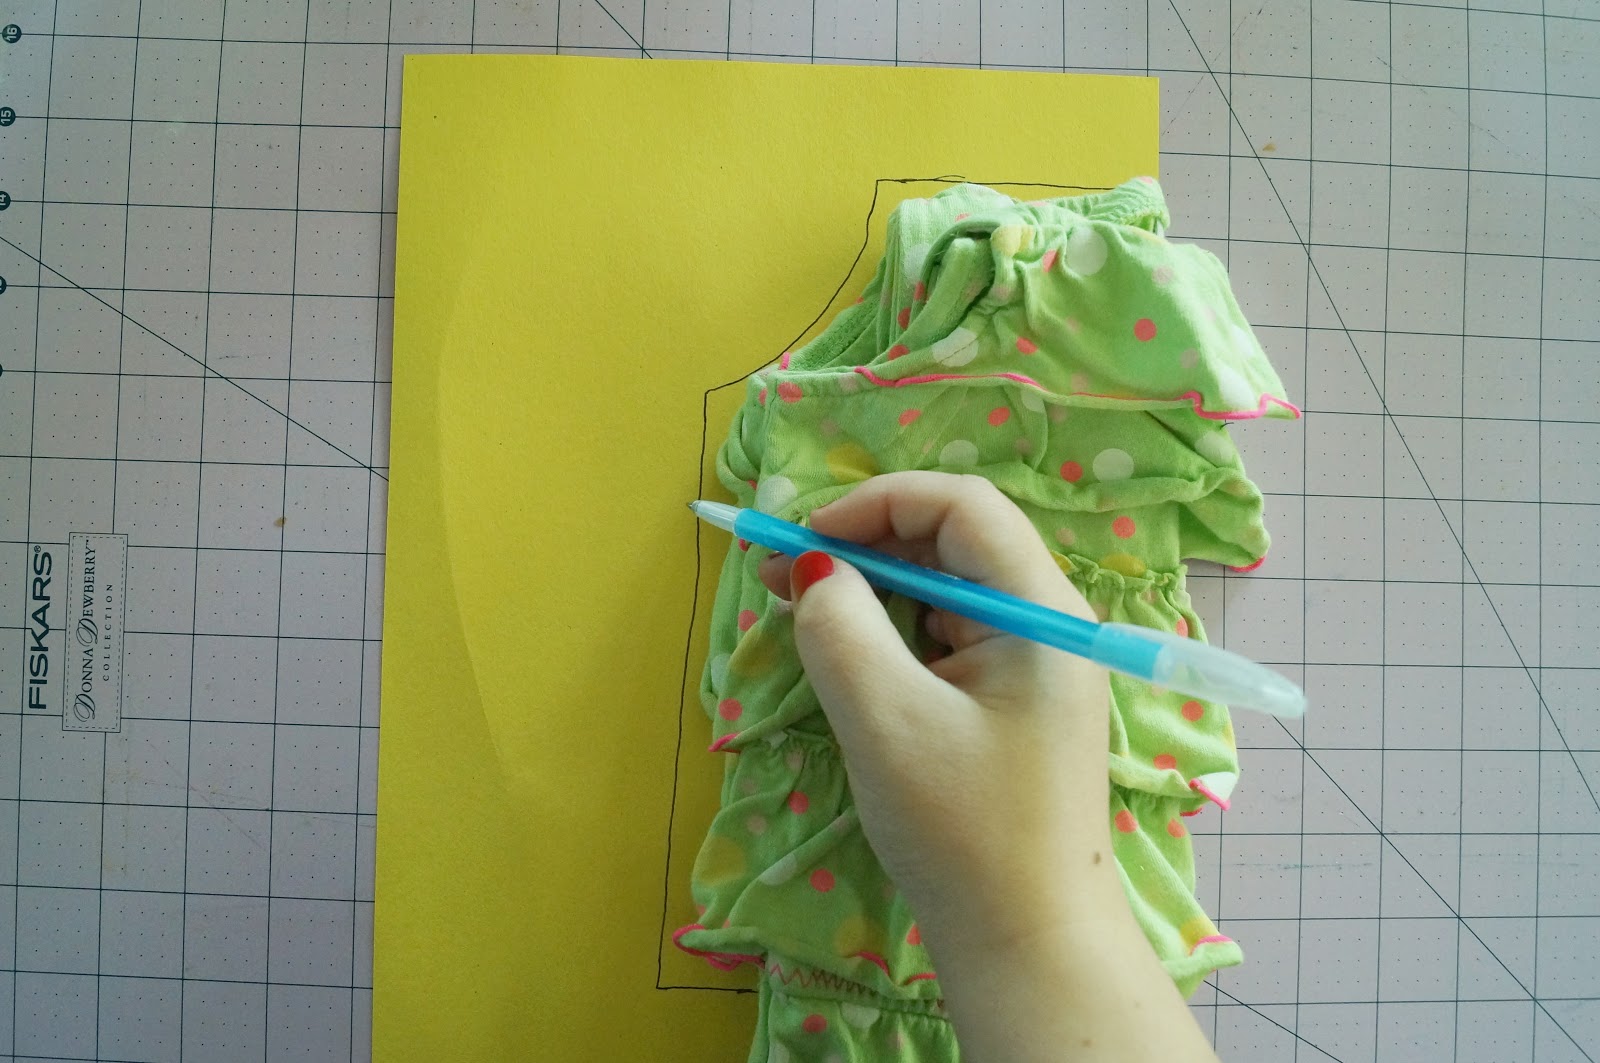
Simple lay the shirt folded in half on a piece of construction paper or card stock (you can certainly use other paper but I prefer the sturdiness of these so you can reuse the pattern over and over). Tuck the straps in, and the sleeves if you are using a t-shirt. Then trace.

Done. You just made a custom pattern FOR FREE. I know your feeling pretty awesome right about now... I would to if I were you.
Lay the long side of the pattern on the fold. Cut 2 tops. While you are cutting also measure out 2: 6.5 x 1.5 and 4: 12.5 x 1.5 strips. I didn't include these in the pattern.
(I forgot to take a picture of this step with the pink fabric so I'm showing you with blue)
(I forgot to take a picture of this step with the pink fabric so I'm showing you with blue)

Once you have the above pieces then proceed.


Time to sew the tank top together! Lay both pieces right sides facing. Sew up the sides. Also to avoid fraying along the edges do a simple zig zag stitch or use a serger if you have one!
I would go ahead and do the same to the bottom of the top now. You can wait until the end if you would like... but I like to do it at this point. You will zig zag stitch then fold up 1/4 inch and sew a straight line for a nice finished edge.

Now for the hardest part of the tank... but don't worry its not actually hard. The gathering at the top of the tank. Let me be clear and say that you don't have to gather it if you have made your own pattern, but I think it adds a nice touch. Here is what you need to do... for the cheating way to gather.

Set your tension ALL THE WAY HIGH.
Then set your width and length ALL THE WAY HIGH.
It will gather up all on its own as you sew a straight line. It will actually gather so much that will have to stretch it out just a bit to ungather... make sure if you are using my pattern to have the gathering section be a total width of 6.5 inches.

Now we will sew the binding on. EASY PEASY. Right sides facing sew a straight line on the gathered section with your 6.5 inch piece. This is what it will look like when you go to fold it to do the inside. Pretty huh?

Fold over and repeat. DONE. Yep. It was that easy. Repeat on the back side.
Now is the time to add a tag or size in if you choose to!
I am due with another baby girl in June... so I need these sizes in the clothes to remember what tops will fit her when! Which really makes these tops even cheaper because they are getting 2 years of use. Awesome.

Sew the end of 2 of the long pieces together. Right sides facing.

Pin the long piece to the arm of the shirt. Center the joined part at the center of the shirt to make sure you have perfectly even straps (this is why I cut 4 pieces instead of 2).

Fold over and sew a straight line again... the same way you did it at the gathering.

Your done! Give yourself a pat on the back and try it on your little lady... and then make 3 more.
Here is my daughter Sadie trying out her super cute top!


She was more into roaring at me and exploring than modeling. The skirt she is wearing is for you to learn all about on another day of our handmade summer series! :)
I hope you feel inspired!
I hope you feel inspired!

No comments
Post a Comment
Jump in the conversation! Leave some comment love...